Community Training Classes & Labs > Agility - DNS Index
Agility 2017 Hands-on Lab Guide
Written for: TMOS® v13.0.0
Presented by: DNS 2017 F5 Agility Team
4. DNS Services Beyond GSLB with BIG-IP DNS (201)
4.1. AUTHORITATIVE NS: SLAVE FROM OFF-BOX BIND
- Objective: In this use-case, you will configure GTM as the authoritative slave using an off-box BIND server as the hidden master. This is a very common architecture to serve either external or internal zones with large scale RPS via DNS Express. You will configure the following common components:
- DNS Profile and Listeners
- DNS Express
- DNS Query Logging
- DNS Statistics
- DNSSEC signing
- Estimated completion time: 25 minutes
4.1.1. Configuring DNS Logging
- You are going to configure DNS query and response logging. To do this, you must tell GTM where to send logs to (a log publisher) and what specifically to log (DNS logging profile).
- For lab purposes, we are going to use local-syslog as our logging destination.
Note
remote high-speed logging is highly recommended for production environments.
- Log in to https://gtm1.site1.example.com from the jumpbox desktop and using user: admin password: admin
- In the GUI, navigate to: System > Logs > Configuration > Log Publishers: Create
- Create a new DNS Log Publisher as shown in the table below.
Keep the defaults if not noted in the table.
| Name | dns-local-syslog |
|---|---|
| Destinations | Move local-syslog to Selected column |
- Click Finished to create.
- In the GUI, navigate to: DNS > Delivery > Profiles > Other > DNS Logging: Create
- Create a new DNS logging profile as shown in the table below.
Keep the defaults if not noted in the table.
| Name | dns-logging |
|---|---|
| Log Publisher | Select dns-local-syslog |
| Log Responses | Enabled |
| Include Query ID | Enabled |
- Click Finished to create.
- Your new dns-logging profile should now have all options enabled.
4.1.2. Create a new DNS Profile
- A DNS profile tells the DNS Listener how to process DNS traffic. We’re going to make some tweaks for our use-case and lab environment.
- In the GUI, navigate to: DNS > Delivery > Profiles > DNS: Create
- Create a new DNS profile as shown in the table below.
Keep the defaults if not noted in the table.
| Name | AuthNS-offbox-BIND |
|---|---|
| Unhandled Query Action | Drop |
| Use BIND Server on Big-IP | Disabled |
| Logging | Enabled |
| Logging Profile | dns-logging |
| AVR Statistics Sampling Rate | Enabled; 1/1 queries sampled |
- Click Finished to create.
- For lab purposes, we are going to use sample all DNS queries with AVR.
Note
production sampling rates would be a much lower rate as this would severely impact performance.
4.1.3. Create DNS Listeners
We are going to create both UDP and TCP external listeners. The external Listener will be our target IP address when querying GTM.
- In the GUI, navigate to: DNS > Delivery > Listeners > Listener List: Create
- Create two external Listeners as shown in the tables below.
Keep the defaults if not noted in the table.
| Name | external-listener-UDP |
|---|---|
| Destination | Host: 203.0.113.8 |
| VLAN Traffic | Enabled on.. |
| VLANs and Tunnels | External |
| DNS Profile | AuthNS-offbox-BIND |
| Name | external-listener-TCP |
|---|---|
| Destination | Host: 203.0.113.8 |
| VLAN Traffic | Enabled on.. |
| VLANs and Tunnels | External |
| Protocol | TCP |
| DNS Profile | AuthNS-offbox-BIND |
- For each Listener, click Finished to create.
- You should now have two UDP-based DNS Listeners and two TCP-based Listeners configured.


4.1.6. Enable DNSSEC for the zone
We will now sign the dnsx.com zone. In this example, we are configuring GTM to sign the zone on the fly rather than signing the actual static zone information (which can be done starting in v11.5 but is outside the scope of this lab).
- In the GUI, navigate to: DNS > Delivery > Keys > DNSSEC Key List: Create
- Create two keys as defined in the tables below.
Keep the defaults if not noted in the table.
| Name | dnsx.com_zsk |
|---|---|
| Type | Zone Signing Key |
| Key Management | Manual |
| Certificate | default.crt |
| Private Key | default.key |
| Name | dnsx.com_ksk |
|---|---|
| Type | Key Signing Key |
| Key Management | Manual |
| Certificate | default.crt |
| Private Key | default.key |
- Click Finished to create each key.
- In the GUI, navigate to: DNS > Zones > DNSSEC Zones > DNSSEC Zone List: Create
- Configure the dnsx.com zone for DNSSEC using the previously created keys as shown below.

- Test that the zone is successfully signed by issuing a DNSSEC query to the external listener. For example:
dig @203.0.113.8 +dnssec www1.dnsx.com
You should see RRSIG records indicating that the zone is signed. You
will also note signing in the query logs (/var/log/ltm)
- Finally, view some other DNS statistics related to queries, DNSSEC, zone transfers, notifies, etc.
- In the GUI, navigate to: DNS > Zone > Zones > Zone List.
- Click on the “dnsx.com” zone and then select “Statistics” from the top menu bar.
- Select the “View” Details as shown in the diagram below:

- View the types of statistics available for the zone such as serial number, number of records, etc.
- In the GUI, navigate to: Statistics > Module Statistics > DNS > Zones.
- Set “Statistics Type” to “DNSSEC Zones”.
- View details as performed above. Note the various DNSSEC statistics available.
- If the graphs from task 5 weren’t available earlier, revisit Statistics > Analytics > DNS now and explore.
4.2. Authoritative Name Server: slave from ON-BOX BIND
In this use-case, you will configure GTM as an authoritative slave using on-box BIND managed by ZoneRunner.
Estimated completion time: 15 minutes
4.2.1. Create a new DNS Profile
- In the GUI, navigate to: DNS > Delivery > Profiles > DNS: Create. Create a new DNS profile as shown in the table below.
Keep the defaults if not noted in the table.
| Name | AuthNS-onbox-BIND |
|---|---|
| Unhandled Query Action | Drop |
| Use BIND Server on Big-IP | Disabled |
| Logging | Enabled |
| Logging Profile | dns-logging |
| AVR Statistics Sampling Rate | Enabled; 1/1 queries sampled |
- Click Finished to create.
For lab purposes, we are going to sample all DNS queries with AVR.
Note
Production sampling rates would be a much lower rate.
4.2.2. Edit DNS Listeners
We need to edit the external-listeners to use the new DNS profile created above.
- In the GUI, navigate to: DNS > Delivery > Listeners > Listener List
- Edit the external-listener-UDP to use the AuthNS-onbox-BIND DNS profile.
- Edit the external-listener-TCP to use the AuthNS-onbox-BIND DNS profile.
- Click Update after change DNS profile to finish edition.
4.2.3. Create a Student1.com zone using ZoneRunner
- In the GUI, navigate to: DNS > Zones: ZoneRunner > Zone List: Create
- Add a student1.com zone with the information as shown in the following screenshot. Note the “also-notify” message needs to be added to send a NOTIFY message to an internal GTM IP address for processing. Likewise BIND needs to allow the transfer from the loopback address. The diagram below shows the basic operation.


4.2.4. Create a Nameserver for on-box BIND
Next, we need to tell DNS Express that on-box BIND is available to use as a source for zone transfers.
- In the GUI, navigate to: DNS > Delivery > Nameservers > Nameserver List: Create
- Create a loopback as a Nameserver as shown in the table below.
Keep the defaults if not noted in the table.
| Name | ZoneRunner |
|---|---|
| Address | 127.0.0.1 |
- Click Finished to create.
4.2.5. Create a DNS Express zone to transfer from ZoneRunner
We will now configure the specific zone for GTM to obtain from ZoneRunner. Note that on-box BIND already has some key configuration elements to consider:
- “Allow-transfer” from the localhost.
- “Also-notify” for DNS Express internal Listener IP address.
- TSIG is disabled.
- In the GUI, navigate to: DNS > Zones > Zones > Zone List: Create
- Create the “student1.com” zone as shown in the figure below and then click Finished.

- Perform the same validation steps as the previous lab for validating the successful transfer of student1.com to DNS Express
- View the details of the zone in the GUI
- Issue the following command from the ssh console:
tmsh show ltm dns zone student1.com | more
- Dump the dns express output to see the records
dnsxdump | more
- Verify logs in
/var/log/ltm - From a command prompt on your jumpbox, issue a query to the external listener for a record in the zone
dig @203.0.113.8 SOA student1.com
- Add a new record to the Student1.com zone in ZoneRunner
- In the GUI, navigate to: DNS > Zones: ZoneRunner > Resource Record List.
- Select View Name -> external
- Select Zone Name -> student1.com.
- Click Create
- Enter a new A record similar to the figure below for your zone and click Finished.

- Validate the DNS Express was updated by performing a dnsxdump and/or query for your new record to the Listener.
- Add another record using the steps above for www2.student1.com
with IP address of 203.0.113.102 but before doing this, make sure to
have a putty session open to your BIG-IP1 and tail the logs using
tail –f /var/log/ltmto view the changes. By making a change to the zone on the Hidden Master (in this case ZoneRunner), you will see a proactive update to DNS Express via a NOTIFY. Watch the/var/log/ltmfile to see the update occur. The logs should look something like this:
Jun 5 08:21:26 bigip1 notice zxfrd[6429]: 0153101c:5: Handling NOTIFY for zone student1.com.
Jun 5 08:21:26 bigip1 debug zxfrd[6429]: 01531008:7: Resetting transfer state for zone student1.com.
Jun 5 08:21:26 bigip1 debug zxfrd[6429]: 01531023:7: Scheduling zone transfer in 5s for student1.com from 127.0.0.1.
Jun 5 08:21:26 bigip1 debug zxfrd[6429]: 01531027:7: Notify response to ::1 succeeded (81:na).
Jun 5 08:21:31 bigip1 notice zxfrd[6429]: 0153101f:5: IXFR Transfer of zone student1.com from 127.0.0.1 succeeded.
Issue a dnsxdump | more command for the SSH console or a query to the
listener to validate the zone file has updated.
4.3. Slaving off of DNS Express
In this use-case, we will obtain a zone transfer from another F5’s DNS Express. This is a common deployment in a hybrid on-premise and cloud-based DNS solution. Our purpose here is to focus on DNS Express serving zone transfer clients. Note that zones can be signed during a transfer – but this is outside the scope of this lab
- Estimated completion time: 10 minutes
4.3.1. Create a new DNS Profile
- In the GUI, navigate to: DNS > Delivery > Profiles > DNS: Create. Create a new DNS profile as shown in the table below.
Keep the defaults if not noted in the table.
| Name | AuthNS-hybrid |
|---|---|
| Unhandled Query Action | Drop |
| Use BIND Server on Big-IP | Disabled |
| Zone Transfer | Enabled |
| Logging | Enabled |
| Logging Profile | dns-logging |
| AVR Statistics Sampling Rate | Enabled; 1/1 queries sampled |
- For lab purposes, we are going to use sample all DNS queries with AVR.
Note
that production sampling rates would be a much lower rate.
4.3.2. Edit DNS Listeners
- In the GUI, navigate to: DNS > Delivery > Listeners > Listener List
- Edit the external-listener-TCP to use the AuthNS-hybrid DNS profile.
- Click Update to finish.
4.3.3. Create Nameservers for Zone Transfer Clients
- Your lab environment has a second pre-configured BIG-IP (BIGIP2) that we will use as the on-prem DNS Express Master.
- In the GUI, navigate to: DNS > Delivery > Nameservers > Nameserver List: Create
- Create BIGIP2’s F5 as a Nameserver as shown in the table below. You will use the External SelfIP/Listener.
Keep the defaults if not noted in the table.
| Name | site2_gtm1_master |
|---|---|
| Address | 198.51.100.39 |
4.3.4. Edit Student2 Zones on BIGIP2 to allow Zone transfers
- Log in to gtm1.site2 (shortcut located on desktop) using a new browser window with the following credentials:
- https://10.1.10.23
- User: admin Pass: admin
- In the GUI, navigate to: DNS > Zones > Zones > Zone List
- Edit the existing student2.com zone.
- Under Zone Transfer Clients, move gtm1.site1 (pre-defined to save time) to Active and click Update.
Note
The internal TCP listener on BIGIP2 is using the AuthNS-hybrid profile which is setup exactly like the profile with the same name on BIGIP1. ‘Zone Transfer = Enabled’ must be set in the profile on the source for this to work correctly.
- Return to your BIGIP1 browser session
4.3.5. Add Student2.com zone to DNS Express on BIGIP1
- In the GUI on BIGIP1, navigate to: DNS > Zones > Zones > Zone List: Create
- Create the “student2.com” zone as shown in the figure below and then click Finished. Your GTM is acting as a zone transfer client in this case (looking to receive a transfer of the on-prem student2.com local zone). This example shows BIGIP1 adding the student2.com zone to pull from DNS Express on BIGIP2.

- Perform the same validation steps as the previous lab for validating the successful transfer of student2.com zone
- View the details of the zone in the GUI
- Issue a
dnsxdump | morecommand from SSH console - Verify logs in
/var/log/ltm - Issue a query to the external listener for a record in the zone
dig @203.0.113.8 SOA student2.com
- Open putty sessions to both BIGIP1 and BIGIP2 and tail the logs using
tail –f /var/log/ltm. This will allow us to see the process of adding a new record on the Master on-prem server (BIGIP2) and then it being replicated first to DNS Express on its own box, followed by an update to the cloud GTM (BIGIP1) in this scenario. - Add a new record to the student2.com zone in ZoneRunner on gtm1.site2
- In the GUI, navigate to: DNS > Zones: ZoneRunner > Resource Record List
- Select View Name -> external
- Select Zone Name -> student2.com.
- Click Create
- Enter a new A record based on the picture below and click Finished.

- Notice the logs in each F5. You will see BIGIP2 perform a zone transfer from ZR after receiving a NOTIFY. You will then see BIGIP1 receive a NOTIFY and obtain a zone transfer.
- Notice that we didn’t have to tell GTM where to send a NOTIFY. Those messages are automatically sent to the Zone Transfer Clients configured for the zone.
- Issue the following command from SSH console on BIGIP1 to see the status and statistics related to the zone. Take note of the “Notifies Received” counter.
tmsh show ltm dns zone student2.com | more
- Issue the following command from SSH console on BIGIP2 to see the status and statistics related to the zone. Take note of the “Notifies To Client” counter.
tmsh show ltm dns zone student2.com | more
- Validate DNS Express was updated by performing a
dnsxdump | moreand/or query for your new record to the Listener.
Close out your browser session to gtm1.site2, we will no longer be using it.
4.4. Transparent Caching
In this use-case, you will configure GTM as a transparent cache to a pool of BIND servers.
- Estimated completion time: 10 minutes

4.4.1. Create a DNS Cache
- In the GUI, navigate to: DNS > Caches > Cache List: Create
- Create a new DNS profile as shown in the table below.
Keep the defaults if not noted in the table.
| Name | transparent-cache |
|---|---|
| Resolver Type | Transparent (none) |
- Click Finished to create.
4.4.2. Create a new DNS Profile
- In the GUI, navigate to: DNS > Delivery > Profiles > DNS: Create. Create a new DNS profile as shown in the table below.
Keep the defaults if not noted in the table.
| Name | Transparent |
|---|---|
| DNSSEC | Disabled |
| GSLB | Disabled |
| DNS Express | Disabled |
| DNS Cache | Enabled |
| DNS Cache Name | transparent-cache |
| Use BIND Server on Big-IP | Disabled |
| Logging | Enabled |
| Logging Profile | dns-logging |
| AVR Statistics Sampling Rate | Enabled; 1/1 queries sampled |
Click Finished when complete.
4.4.3. Create a DNS Monitor
- In the GUI, navigate to: DNS > Delivery > Load Balancing > Monitors: Create. Create a new DNS monitor as shown in the table below.
Keep the defaults if not noted in the table.
| Name | mon_resolver |
|---|---|
| Type | DNS |
| Query Name | www.f5.com |
- Click Finished to create.
4.4.4. Create a Resolver Pool
- In the GUI, navigate to: DNS > Delivery > Load Balancing > Pools > Pools List: Create. Create a new pool of DNS resolvers as shown in the figure below.
- Add pool called pool_resolvers with health monitor (mon_resolver) and members as shown in table and diagram below:
| Pool Members |
|---|
| 198.51.100.39:53 |
| 203.0.113.15:53 |
| 198.51.100.47:53 |

4.4.5. Create a new External DNS Listener
We are going to create a new external-facing DNS Listener to cache DNS requests and load-balance non-cached requests to pool_resolvers.
- In the GUI, navigate to: DNS > Delivery > Listeners > Listener List: Create
- Create a Listener named ‘resolver-listener’ as shown in the figure below. Use the Listener IP of 203.0.113.9
Note
you need to be in the “Advanced” Menu to set some of the options.

- From your workstation at a command prompt, perform several recursive queries to your new listener to test. You will want to repeat some of the same queries multiple times We are attempting to see cache hits. Below are some examples:
dig @10.128.10.54 www.f5.com
dig @10.128.10.54 www.wikipedia.org
dig @10.128.10.54 www.ncsu.edu
- You should have successful resolution. Now it’s time to see statistics and cache entries.
Viewing Cache Entries
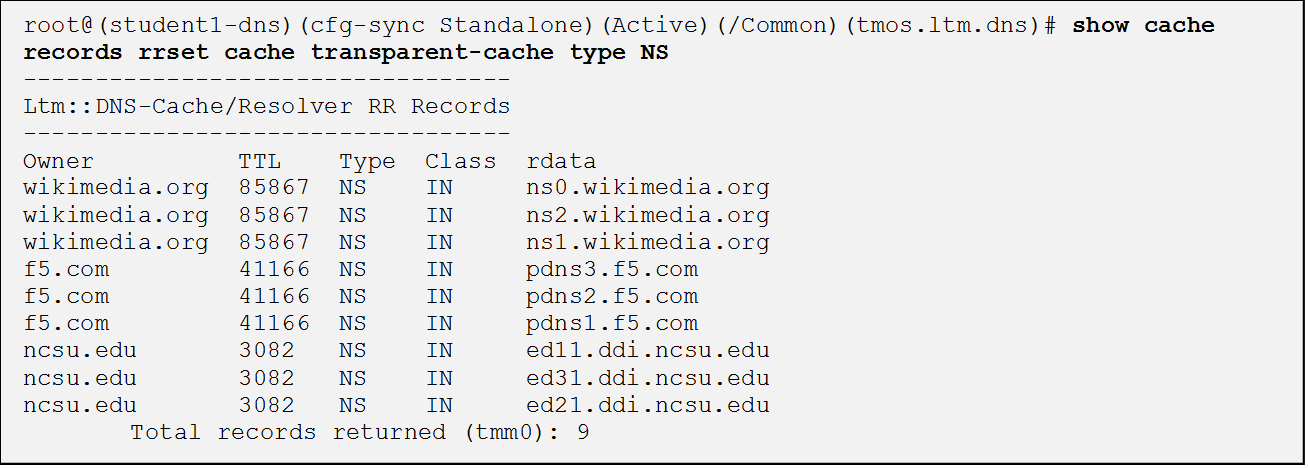
- In the SSH shell, type the following command:
tmsh show ltm dns cache records rrset cache transparent-cache
- Your output should look similar to below with several entries

- If you go to the TMSH console, you can see several other ways to query the cache database. Below show some examples.
- View cache entries for a particular domain / owner:

- View cache entries of a particular RR type:
- There are other options… feel free to play around and familiarize yourself with the options.
Viewing Cache Statistics
- In the SSH shell, type:
tmsh show ltm dns cache transparent transparent-cache
- Your output should look similar to below with statistics showing Hits and Misses in particular.

- In the GUI, you can find similar data as above by navigating Statistics > Module Statistics > DNS > Caches.
- Select “Statistics Type” of Caches.
- Select “View” under the Details column for transparent-cache
- Note that stats can also be reset from this view (Reset).

- Spend some time looking in the DNS Analytics to verify that AVR is graphing query stats as expected.
Deleting Cache Entries
- Specific cache entries can be deleted via the TMSH console. Entries to be deleted can be filtered by several aspects.
- In the TMSH shell, go to the DNS prompt and type
delete cache records rrset cache transparent-cache ?
- Now delete individual records by type and owner. Below show some examples.

Clearing Entire Cache
- Via the GUI, navigate to Statistics > Module Statistics > DNS > Caches
- Set “Statistics Type” to “Caches”.
- You can select the cache and click “Clear Cache” to empty the cache.
4.5. Resolver Cache
In this use case, you will configure GTM as a resolver cache which eliminates the need for the pool of resolvers. * Estimated completion time: 10 minutes

4.5.1. Create a new DNS Cache
- In the GUI, navigate to: DNS > Caches > Cache List: Create
- Create a new DNS Cache as shown in the table below.
Keep the defaults if not noted in the table.
| Name | resolver-cache |
|---|---|
| Resolver Type | Resolver |
4.5.2. Create a new DNS Profile
- In the GUI, navigate to: DNS > Delivery > Profiles > DNS: Create. Create a new DNS profile as shown in the table below.
Keep the defaults if not noted in the table.
| Name | Resolver |
|---|---|
| DNSSEC | Disabled |
| GSLB | Disabled |
| DNS Express | Disabled |
| DNS Cache | Enabled |
| DNS Cache Name | resolver-cache |
| Unhandled Query Action | Drop |
| Use BIND Server on Big-IP | Disabled |
| Logging | Enabled |
| Logging Profile | dns-logging //from previous lab |
| AVR Statistics Sampling Rate | Enabled; 1/1 queries sampled |
4.5.3. Edit DNS Listener
We will now apply the new profile to the existing DNS Listener.
- In the GUI, navigate to: DNS > Delivery > Listeners > Listener List
- Select ‘resolver-listener’ and modify the following settings.
- Change the DNS profile to ‘resolver’ and uncheck “Address Translation” (under Listener Advanced options). Click Update.
- Select “Load Balancing” from the middle menu above, and Select the Default Pool as “None” and click Update.
- Your Listener should now be setup as a caching resolver.
- From your workstation command prompt, perform several recursive queries to your external Listener to test. You will want to repeat some of the same queries multiple times. We are attempting to see cache hits and perform recursive queries. Below are some examples:
dig @10.128.10.54 www.cnn.com

dig @10.128.10.54 www.google.com

dig @10.128.10.54 www.umich.edu
Viewing Cache Statistics
- In the SSH shell, type the following command:
tmsh show ltm dns cache resolver resolver-cache | more
Your output should look similar to below with statistics. Bits In/Out, Packets In/Out and Connections are of particular interest.

4.6. DNSSEC Validating Resolver
In this use case, you will configure GTM as a DNSSEC validating resolver which offloads heavy CPU computation to traditional resolvers. This simply adds DNSSEC validation to the resolver-cache use-case previously configured. * Estimated completion time: 10 minutes
4.6.1. Create a new DNS Cache
- In the GUI, navigate to: DNS > Caches > Cache List: Create
- Create a new DNS cache as shown in the table below.
Keep the defaults if not noted in the table.
| Name | validating-resolver |
|---|---|
| Resolver Type | Validating Resolver |
- A Trust Anchor must be configured so that the validating resolver has a starting point for validation. This can be done manually via the SSH console. You can obtain the root server DS keys by using dig and its related utilities as follows:
Note
In the interest of time, the trust anchors are located on your desktop as a text file named TrustAnchors.txt. You can simply cut and paste the values into the GUI. If you want to run the utilities to obtain the anchors, the commands are below for your reference.
- Get the root name servers in DNSKEY format and output to the file “root-dnskey”
>dig +multi +noall +answer DNSKEY . >root-dnskey
- Convert the root trust anchors from DNSKEY format to DS
>dnssec-dsfromkey -f root-dnskey . >root-ds
- Output of the root DS keys
>cat ./root-ds

IN DS 19036 8 1 B256BD09DC8DD59F0E0F0D8541B8328DD986DF6E

IN DS 19036 8 2
49AAC11D7B6F6446702E54A1607371607A1A41855200FD2CE1CDDE32 F24E8FB5
- Each of the 2 lines in the TrustAnchor.txt file should be entered as a new trust anchor (2 total).
- In the GUI, navigate to: DNS > Caches > Cache List. Select “validating-resolver” and click on Trust Anchors on the top menu. Click Add. Copy each line from the TrustAnchor.txt file as a Trust Anchor entry. You should end with a total of two entries.
- The figure below shows what your configuration should look like.

4.6.2. Create a new DNS Profile
In this task we will create a dns profile to be used by a listener for DNSSEC validation. * In the GUI, navigate to: DNS > Delivery > Profiles > DNS: Create. * Create a new DNS profile as shown in the table below.
Keep the defaults if not noted in the table.
| Name | Validating |
|---|---|
| DNSSEC | Disabled |
| GSLB | Disabled |
| DNS Express | Disabled |
| DNS Cache | Enabled |
| DNS Cache Name | validating-resolver |
| Unhandled Query Action | Drop |
| Use BIND Server on Big-IP | Disabled |
| Logging | Enabled |
| Logging Profile | dns-logging //from previous lab |
| AVR Statistics Sampling Rate | Enabled; 1/1 queries sampled |
4.6.3. Edit DNS Listener
We will now apply the new profile to the existing DNS Listener.
- In the GUI, navigate to: DNS > Delivery > Listeners > Listener List
- Select ‘resolver-listener’ and modify the DNS Profile to use “validating”.
- Your Listener should now be setup as a validating resolver.
- Use-Case: Valid Signed Zone. From your workstation, perform several recursive queries to your external Listener to test. Perform the following command 2 or 3 times:
dig @10.128.10.54 internetsociety.org
- In the SSH shell, type the following:
tmsh show ltm dns cache validating-resolver | more
Your output should look similar to below with statistics. Response Validation and DNSSEC Key stats are of particular interest in this use-case.

- In the GUI, you can find similar data as above by navigating Statistics > Module Statistics > DNS > Caches.
- Select “Statistics Type” of Caches.
- Select “View” under the Details column for validating-resolver
- Note the size of the cache for just this single RR query. You can view what’s in the cache from the CLI with:
tmsh show ltm dns cache records rrset cache validating-resolver | more
- Use-Case: Invalid Signed Zone: From your workstation, perform several recursive queries to your external Listener to test. Perform the following command 2 or 3 times:
dig @10.128.10.54 dnssec-failed.org
- Run the same steps above to view statistics and see the difference
- What happens when trust is broken.
- What statistic incremented?
- What was the query response to the client?
4.7. Forwarders
In this use-case, we will configure conditional forwarders with local zone information.
- Estimated completion time: 5 minutes
4.7.1. Add Forwarder to Existing Cache
- In the GUI, navigate to: DNS > Caches > Cache List. Click on validating-resolver from the previous exercise. Click Forward Zones from the top menu.
- Click Add and configure as shown in the figure below and then click Finished:

- From your workstation, perform the following recursive queries to your external Listener to test.
dig @10.128.10.54 www.forward.com

dig @10.128.10.54 mail.forward.com
- In the SSH shell, type the following tmsh command:
tmsh show ltm dns cache validating-resolver | more
Your output should look similar to below with statistics. Forwarder Activity stats are of particular interest in this use-case.

- In the GUI, you can find similar data as above by navigating Statistics > Module Statistics > DNS > Caches.
- Select “Statistics Type” of Caches.
- Select “View” under the Details column for validating-resolver